title: "如何安装 WordPress" post_status: publish comment_status: open taxonomy: category: - advanced-administration-handbook post_tag: - Before Install - Repos - Data
如何安装 WordPress
WordPress 以其安装简便而闻名。在大多数情况下,安装 WordPress 是一个非常简单的过程,只需不到五分钟即可完成。许多网络主机现在提供工具(例如 Fantastico)来自动为您安装 WordPress。不过,如果您希望自己安装 WordPress,以下指南将为您提供帮助。
安装 WordPress 前须知
在开始安装前,你需要准备并完成一些事项。请参阅文章安装前准备。同时,建议验证你的主机邮件发送功能是否正常。更多信息请参考邮件。 如需安装多个 WordPress 实例,请参阅安装多个 WordPress 实例。
基本安装指南
以下是针对已熟悉此类安装操作人员的快速指南。更详细的说明将在后续提供。
- 下载并解压 WordPress 安装包(如尚未操作)
- 在服务器上为 WordPress 创建数据库,同时创建拥有该数据库完全访问权限的 MySQL(或 MariaDB)用户
- (可选步骤)找到
wp-config-sample.php文件并重命名为wp-config.php,编辑该文件(参见编辑 wp-config.php)并添加数据库信息 注意: 若不熟悉文件重命名操作,可跳过第三步,安装程序将自动创建wp-config.php文件 - 将 WordPress 文件上传至服务器目标位置:
- 若需将 WordPress 集成至网站根目录(如 https://example.com/),请将解压后的 WordPress 目录内所有内容(不包括 WordPress 目录本身)移动或上传至服务器根目录
- 若需将 WordPress 安装至网站子目录(如 https://example.com/blog/),请在服务器创建 blog 目录并通过 FTP 将解压后的 WordPress 内容上传至该目录
- 注意: 若 FTP 客户端有文件名转小写选项,请确保该功能已禁用
- 通过浏览器访问安装脚本的 URL(即上传 WordPress 文件的地址):
- 若安装在根目录,请访问:https://example.com/
- 若安装在子目录(如 blog),请访问:https://example.com/blog/ 至此完成!WordPress 现已安装完毕。
详细说明 {#detailed-instructions}
步骤 1:下载并解压
从 wordpress.org/download/ 下载并解压 WordPress 安装包。
- 如果您要将 WordPress 上传到远程 Web 服务器,请使用网页浏览器将 WordPress 安装包下载到您的计算机并解压。
- 如果您将使用 FTP,请跳到下一步 – 文件上传将在后面介绍。
-
如果您对您的 Web 服务器拥有 shell 访问权限,并且习惯使用基于控制台的工具,您可能希望直接使用 wget(或 lynx 或其他基于控制台的网页浏览器)将 WordPress 下载到您的 Web 服务器上,以避免使用 FTP:
- wget https://wordpress.org/latest.tar.gz
- 然后使用以下命令解压包:
- tar -xzvf latest.tar.gz
WordPress 包将解压到您下载 latest.tar.gz 的同一目录中一个名为 wordpress 的文件夹里。
步骤 2:为 WordPress 创建数据库 {#detailed-step-2}
如果您使用的是托管服务提供商,可能已为您设置好 WordPress 数据库,或者可能有自动设置解决方案。请查看托管服务提供商的支持页面或控制面板,以确定是否需要手动创建。
如果确定需要手动创建,请按照下方使用 phpMyAdmin 的说明来创建 WordPress 用户名和数据库。对于其他工具(如 Plesk、cPanel 和使用 MySQL 客户端),请参阅文章为 WordPress 创建数据库。
如果只有一个数据库且已在使用,您可以在其中安装 WordPress——只需确保为表使用独特的前缀,以避免覆盖任何现有的数据库表。
使用 phpMyAdmin
如果您的网络服务器已安装 phpMyAdmin,您可以按照以下说明创建 WordPress 用户名和数据库。如果您在自己的计算机上操作,在大多数 Linux 发行版上可以自动安装 PhpMyAdmin。
注意: 这些说明针对 phpMyAdmin 4.4 版本编写;不同版本的 phpMyAdmin 用户界面可能略有差异。
-
如果左侧数据库下拉菜单中尚未存在与 WordPress 相关的数据库,请创建一个:
- 为您的 WordPress 数据库选择一个名称:'
wordpress' 或 'blog' 都是不错的选择,但大多数托管服务(尤其是共享托管)会要求名称以您的用户名和下划线开头。因此,即使您在自己的计算机上操作,我们也建议您查看托管服务的要求,以便在自己的服务器上遵循这些要求,并能够无需修改地迁移数据库。在创建数据库字段中输入选定的数据库名称,并为您的语言和编码选择最佳排序规则。在大多数情况下,最好选择 "utf8_" 系列,如果找不到您的语言,请选择 "utf8mb4_general_ci" (参考这篇关于升级到 utf8mb4 的文章)。
- 点击左上角的 phpMyAdmin 图标返回主页,然后点击 用户 标签。如果用户列表中尚未存在与 WordPress 相关的用户,请创建一个:
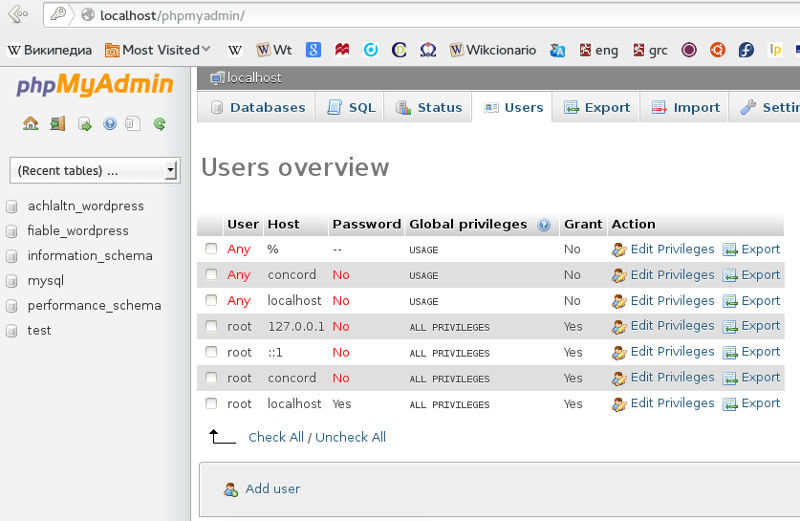
- 点击 添加用户。
- 为 WordPress 选择一个用户名('
wordpress' 是个不错的选择)并在用户名字段中输入。(确保从下拉菜单中选择使用文本字段:。) - 选择一个安全的密码(理想情况下包含大小写字母、数字和符号的组合),并在密码字段中输入。(确保从下拉菜单中选择使用文本字段:。)在重新输入字段中再次输入密码。
- 记下您选择的用户名和密码。
- 保持全局权限下的所有选项为默认设置。
- 点击 执行。
- 返回用户界面,点击您刚刚为 WordPress 创建的用户旁边的编辑权限图标。
- 在数据库特定权限部分,从为以下数据库添加权限下拉菜单中选择您刚刚为 WordPress 创建的数据库,然后点击执行。
- 页面将刷新显示该数据库的权限。点击全选以选择所有权限,然后点击执行。
- 在结果页面上,注意页面顶部服务器:后列出的主机名。(这通常是 localhost。)

- 为您的 WordPress 数据库选择一个名称:'
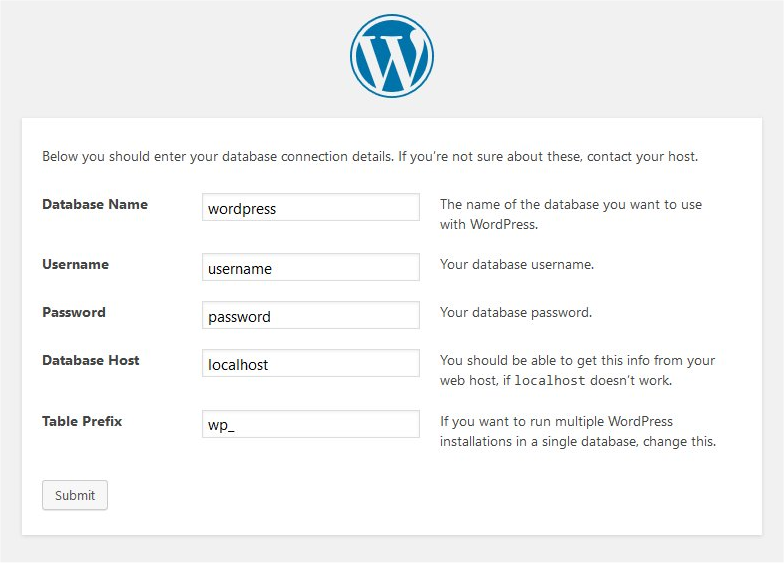
步骤 3:设置 wp-config.php {#detailed-step-3}
您可以自行创建和编辑 wp-config.php 文件,也可以跳过此步骤,让 WordPress 在运行安装脚本(步骤 5)时尝试自行完成此操作。(您仍然需要告诉 WordPress 您的数据库信息)。
(有关创建配置文件和用于密码安全的密钥的更详细说明和分步指南,请参阅 编辑 wp-config.php)。
返回到您在步骤 1 中解压 WordPress 软件包的位置,将文件 wp-config-sample.php 重命名为 wp-config.php,并在文本编辑器中打开它。
在标有以下注释的部分中输入您的数据库信息:
// ** MySQL 设置 - 您可以从您的网络主机获取此信息 ** //
DB_NAME 您在步骤 2 中为 WordPress 创建的数据库名称。 DB_USER 您在步骤 2 中为 WordPress 创建的用户名。 DB_PASSWORD 您在步骤 2 中为 WordPress 用户名选择的密码。 DB_HOST 您在步骤 2 中确定的主机名(通常是 localhost,但并非总是如此;请参阅一些可能的 DB_HOST 值)。如果需要端口、套接字或管道,请在主机名后附加冒号 (:) 和相关信息。 DB_CHARSET 数据库字符集,通常不应更改(请参阅编辑 wp-config.php)。 DB_COLLATE 数据库排序规则通常应留空(请参阅编辑 wp-config.php)。
在标有以下注释的部分中输入您的密钥值:
/* 身份验证唯一密钥和盐。 */
保存 wp-config.php 文件。
Step 4: Upload the files
Now you will need to decide where on your domain you'd like your WordPress-powered site to appear: - In the root directory of your website. (For example, https://example.com/) - In a subdirectory of your website. (For example, https://example.com/blog/)
Note: The location of your root web directory in the filesystem on your web server will vary across hosting providers and operating systems. Check with your hosting provider or system administrator if you do not know where this is.
在根目录中
- 如需将文件上传至网络服务器,请使用 FTP 客户端将 wordpress 目录的全部内容(不包括目录本身)上传至网站根目录。 若文件已在服务器上,且通过 shell 安装 WordPress,请将 wordpress 目录的全部内容(不包括目录本身)移至网站根目录。
在子目录中
- 如果您需要将文件上传到您的网络服务器,请将 wordpress 目录重命名为您想要的名称,然后使用 FTP 客户端将该目录上传到您网站根目录内的目标位置。
- 如果您的文件已在网络服务器上,并且您正在使用 shell 访问来安装 WordPress,请将 wordpress 目录移动到您网站根目录内的目标位置,并将该目录重命名为您想要的名称。
步骤 5:运行安装脚本
在网页浏览器中访问安装脚本。
- 如果您将 WordPress 文件放置在根目录,请访问:https://example.com/wp-admin/install.php
- 如果您将 WordPress 文件放置在子目录(例如名为 blog 的目录)中,请访问:https://example.com/blog/wp-admin/install.php
设置配置文件
如果 WordPress 找不到 wp-config.php 文件,它会提示并尝试自动创建和编辑该文件。(您也可以通过浏览器直接访问 wp-admin/setup-config.php 手动操作。)WordPress 将询问数据库信息并写入新的 wp-config.php 文件。若成功,即可继续安装;否则请返回并自行创建、编辑并上传 wp-config.php 文件(步骤 3)。
完成安装
以下截图展示了安装过程的进展。请注意,在填写详细信息页面时,您需要输入站点标题、期望的用户名、密码(两次)以及电子邮件地址。同时还会显示一个复选框,询问您是否希望您的博客出现在 Google 和 DuckDuckGo 等搜索引擎中。如果您希望您的博客对所有人(包括搜索引擎)可见,请保持复选框未勾选;如果您想阻止搜索引擎但允许普通访客访问,请勾选该复选框。请注意,所有这些信息稍后都可以在您的管理界面中更改。

如果成功安装 WordPress,将显示登录提示。
安装脚本故障排除 - 如果在运行安装脚本时遇到数据库错误: - 请返回步骤 2 和步骤 3,确保您已在 wp-config.php 文件中输入了所有正确的数据库信息。 - 确保您已在步骤 3 中授予 WordPress 用户访问 WordPress 数据库的权限。 - 确保数据库服务器正在运行。
在主流托管公司安装 WordPress {#installing-wordpress-at-popular-hosting-companies}
在 Atlantic.net 安装 WordPress
在 Ubuntu 14.04 LTS 上安装 WordPress 您也可以在 Atlantic.Net 上通过一键式 WordPress 托管在 Ubuntu 上安装 WordPress。
在 AWS 上安装 WordPress
- Installatron WordPress Installatron WordPress 是一个预配置且可立即启动的镜像,包含一个 WordPress 网站和 Installatron 的 WordPress 管理工具。
- 在 AWS 中构建高可扩展的 WordPress 站点架构 本指南介绍如何使用亚马逊关系数据存储(RDS)等工具,构建一个成本更高、高度可扩展的 AWS 实施方案。
在 DigitalOcean 安装 WordPress
在 Linode 安装 WordPress
- 使用 WordPress 管理网站内容 在基于 LAMP 环境的 Debian 服务器上安装 WordPress
您也可以在 Linode 上使用此 StackScript 一键在 Ubuntu 上安装 WordPress。
在 iPage 托管服务上安装 WordPress
- 这是 IStartBlogging 提供的优秀分步教程,介绍如何通过 iPage 托管服务以智能方式设置您的博客。
从现在起不到 5 分钟,您就能在您的域名上准备好博客。您将利用 iPage 托管的“一键安装 WordPress”功能,在您自己的域名上自动完成 WordPress 安装。
在 Microsoft Azure 上安装 WordPress
- 在 Microsoft Azure 上安装 WordPress 只需点击几下即可完成。系统将自动创建并配置托管空间和 MySQL 数据库,您可以在几秒钟内开始创作。
- 遇到问题并需要在 Azure 上对 WordPress 站点进行故障排除?请遵循这份实用的 Azure 上 WordPress 故障排除指南。
- 这里有一份完整的资源列表,介绍如何 深入了解 Microsoft Azure 上的 WordPress!
Common installation problems
The following are some of the most common installation problems. For more information and troubleshooting for problems with your WordPress installation, check out FAQ Installation and FAQ Troubleshooting.
I see a directory listing rather than a web page.
The web server needs to be told to view index.php by default. In Apache, use the DirectoryIndex index.php directive. The simplest option is to create a file named .htaccess in the installed directory and place the directive there. Another option is to add the directive to the web server's configuration files.
I see lots of Headers already sent errors. How do I fix this?
You probably introduced a syntax error in editing wp-config.php.
- Download wp-config.php (if you don't have shell access).
- Open it in a text editor.
- Check that the first line contains nothing but <?php, and that there is no text before it (not even whitespace).
- Check that the last line contains nothing but ?>, and that there is no text after it (not even whitespace).
- If your text editor saves as Unicode, make sure it adds no byte order mark (BOM). Most Unicode-enabled text editors do not inform the user whether or not it adds a BOM to files; if so, try using a different text editor.
- Save the file, upload it again if necessary, and reload the page in your browser.
My page comes out gibberish. When I look at the source I see a lot of "<?php ?>" tags.
If the <?php ?> tags are being sent to the browser, it means your PHP is not working properly. All PHP code is supposed to be executed before the server sends the resulting HTML to your web browser. (That's why it's called a preprocessor.) Make sure your web server meets the requirements to run WordPress, that PHP is installed and configured properly, or contact your hosting provider or system administrator for assistance.
I keep getting an Error connecting to database message but I'm sure my configuration is correct.
Try resetting your MySQL password manually. If you have access to MySQL via shell, try issuing:
SET PASSWORD FOR 'wordpressusername'@'hostname' = OLD_PASSWORD('password');
If you do not have shell access, you should be able to simply enter the above into an SQL query in phpMyAdmin. Failing that, you may need to use your host's control panel to reset the password for your database user.
I keep getting an Your PHP installation appears to be missing the MySQL extension which is required by WordPress message but I'm sure my configuration is correct.
请检查并确保您的 Web 服务器配置正确,且 MySQL 插件已被 Web 服务器程序正确加载。有时,此问题需要检查从 Web 服务器到 MySQL 安装的整个路径中的所有内容,并验证其完全正常运行。配置文件或设置不正确通常是导致此问题的原因。
我的图片/MP3 上传功能无法正常工作。
如果您在安装于子目录的博客上使用富文本编辑器,并将新上传的图片拖拽到编辑器字段中,图片可能会在几秒钟后消失。这是由于 TinyMCE(富文本编辑器)在拖拽操作期间未获得足够信息来正确构建图片或其他文件的路径所致。解决方案是不要将上传的图片拖拽到编辑器中,而是点击并按住图片,然后选择 发送到编辑器。