title: "构建创建页面表单" post_status: publish comment_status: open taxonomy: category: - gutenberg-docs post_tag: - Data Basics - How To Guides - Repos
构建创建页面表单
在上一章节中我们创建了编辑页面功能,本章节我们将添加创建页面功能。以下是我们即将构建内容的预览:
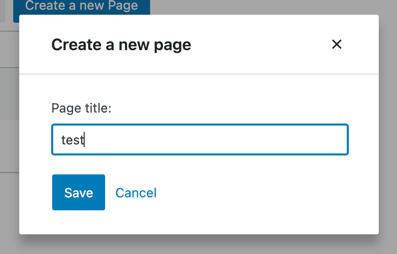
Step 1: Add a Create a new page button
Let’s start by building a button to display the create page form. It’s similar to an Edit button we have built in the part 3:
import { useDispatch } from '@wordpress/data';
import { Button, Modal, TextControl } from '@wordpress/components';

function CreatePageButton() {
    const [isOpen, setOpen] = useState( false );
    const openModal = () => setOpen( true );
    const closeModal = () => setOpen( false );
    return (
        <>
            <Button onClick={ openModal } variant="primary">
                Create a new Page
            </Button>
            { isOpen && (
                <Modal onRequestClose={ closeModal } title="Create a new page">
                    <CreatePageForm
                        onCancel={ closeModal }
                        onSaveFinished={ closeModal }
                    />
                </Modal>
            ) }
        </>
    );
}

function CreatePageForm() {
    // Empty for now
    return <div/>;
}
Great! Now let’s make MyFirstApp display our shiny new button:
function MyFirstApp() {
    // ...
    return (
        <div>
            <div className="list-controls">
                <SearchControl onChange={ setSearchTerm } value={ searchTerm }/>
                <CreatePageButton/>
            </div>
            <PagesList hasResolved={ hasResolved } pages={ pages }/>
        </div>
    );
}
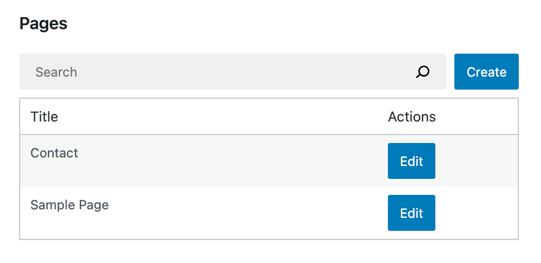
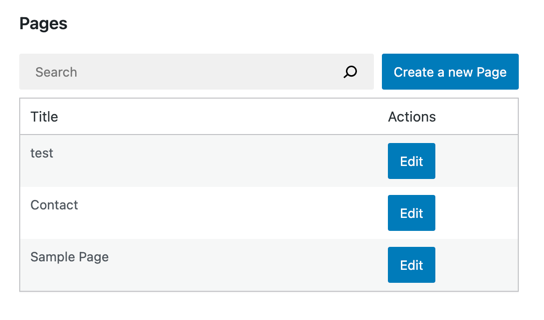
The final result should look as follows:
Step 2: Extract a controlled PageForm
Now that the button is in place, we can focus entirely on building the form. This tutorial is about managing data, so we will not build a complete page editor. Instead, the form will only contain one field: post title.
Luckily, the EditPageForm we built in part three already takes us 80% of the way there. The bulk of the user interface is already available, and we will reuse it in the CreatePageForm. Let’s start by extracting the form UI into a separate component:
function EditPageForm( { pageId, onCancel, onSaveFinished } ) {
    // ...
    return (
        <PageForm
            title={ page.title }
            onChangeTitle={ handleChange }
            hasEdits={ hasEdits }
            lastError={ lastError }
            isSaving={ isSaving }
            onCancel={ onCancel }
            onSave={ handleSave }
        />
    );
}

function PageForm( { title, onChangeTitle, hasEdits, lastError, isSaving, onCancel, onSave } ) {
    return (
        <div className="my-gutenberg-form">
            <TextControl
                __next40pxDefaultSize
                label="Page title:"
                value={ title }
                onChange={ onChangeTitle }
            />
            { lastError ? (
                <div className="form-error">Error: { lastError.message }</div>
            ) : (
                false
            ) }
            <div className="form-buttons">
                <Button
                    onClick={ onSave }
                    variant="primary"
                    disabled={ !hasEdits || isSaving }
                >
                    { isSaving ? (
                        <>
                            <Spinner/>
                            Saving
                        </>
                    ) : 'Save' }
                </Button>
                <Button
                    onClick={ onCancel }
                    variant="tertiary"
                    disabled={ isSaving }
                >
                    Cancel
                </Button>
            </div>
        </div>
    );
}
This code quality change should not alter anything about how the application works. Let’s try to edit a page just to be sure:
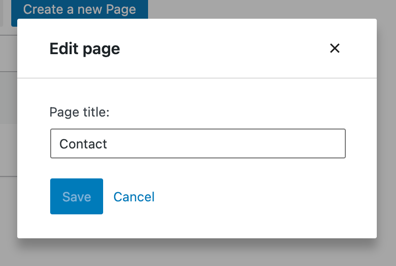
Great! The edit form is still there, and now we have a building block to power the new CreatePageForm.
步骤 3:构建 CreatePageForm 组件
CreatePageForm 组件只需提供渲染 PageForm 组件所需的以下七个属性:
- title
- onChangeTitle
- hasEdits
- lastError
- isSaving
- onCancel
- onSave
接下来我们看看如何实现:
Title、onChangeTitle、hasEdits
EditPageForm 更新并保存了存在于 Redux 状态中的现有实体记录。因此,我们依赖 editedEntityRecords 选择器。
然而,对于 CreatePageForm 来说,不存在预先存在的实体记录。只有一个空表单。用户输入的任何内容都仅属于该表单本地,这意味着我们可以使用 React 的 useState 钩子来跟踪它:
function CreatePageForm( { onCancel, onSaveFinished } ) {
    const [title, setTitle] = useState();
    const handleChange = ( title ) => setTitle( title );
    return (
        <PageForm
            title={ title }
            onChangeTitle={ setTitle }
            hasEdits={ !!title }
            { /* ... */ }
        />
    );
}
onSave, onCancel
在 EditPageForm 中,我们调用了 saveEditedEntityRecord('postType', 'page', pageId ) 操作来保存 Redux 状态中的编辑内容。
然而,在 CreatePageForm 中,Redux 状态中没有任何编辑内容,我们也没有 pageId。在这种情况下,我们需要调用的操作名为 saveEntityRecord(名称中没有 Edited 这个词),它接受一个代表新实体记录的对象,而不是 pageId。
传递给 saveEntityRecord 的数据会通过 POST 请求发送到相应的 REST API 端点。例如,调度以下操作:
saveEntityRecord( 'postType', 'page', { title: "Test" } );
会触发一个 POST 请求到 /wp/v2/pages WordPress REST API 端点,请求体中只有一个字段:title=Test。
现在我们对 saveEntityRecord 有了更多了解,让我们在 CreatePageForm 中使用它。
function CreatePageForm( { onSaveFinished, onCancel } ) {
    // ...
    const { saveEntityRecord } = useDispatch( coreDataStore );
    const handleSave = async () => {
        const savedRecord = await saveEntityRecord(
            'postType',
            'page',
            { title }
        );
        if ( savedRecord ) {
            onSaveFinished();
        }
    };
    return (
        <PageForm
            { /* ... */ }
            onSave={ handleSave }
            onCancel={ onCancel }
        />
    );
}
还有一个细节需要处理:我们新创建的页面尚未被 PagesList 获取。根据 REST API 文档,/wp/v2/pages 端点默认创建(POST 请求)状态为 status=draft 的页面,但返回(GET 请求)状态为 status=publish 的页面。解决方案是显式传递 status 参数:
function CreatePageForm( { onSaveFinished, onCancel } ) {
    // ...
    const { saveEntityRecord } = useDispatch( coreDataStore );
    const handleSave = async () => {
        const savedRecord = await saveEntityRecord(
            'postType',
            'page',
            { title, status: 'publish' }
        );
        if ( savedRecord ) {
            onSaveFinished();
        }
    };
    return (
        <PageForm
            { /* ... */ }
            onSave={ handleSave }
            onCancel={ onCancel }
        />
    );
}
请继续将此更改应用到本地的 CreatePageForm 组件中,接下来我们来处理剩下的两个属性。
lastError, isSaving
The EditPageForm retrieved the error and progress information via the getLastEntitySaveError and isSavingEntityRecord selectors. In both cases, it passed the following three arguments: ( 'postType', 'page', pageId ).
In CreatePageForm however, we do not have a pageId. What now? We can skip the pageId argument to retrieve the information about the entity record without any id – this will be the newly created one. The useSelect call is thus very similar to the one from EditPageForm:
function CreatePageForm( { onCancel, onSaveFinished } ) {
    // ...
    const { lastError, isSaving } = useSelect(
        ( select ) => ( {
            // Notice the missing pageId argument:
            lastError: select( coreDataStore )
                .getLastEntitySaveError( 'postType', 'page' ),
            // Notice the missing pageId argument
            isSaving: select( coreDataStore )
                .isSavingEntityRecord( 'postType', 'page' ),
        } ),
        []
    );
    // ...
    return (
        <PageForm
            { /* ... */ }
            lastError={ lastError }
            isSaving={ isSaving }
        />
    );
}
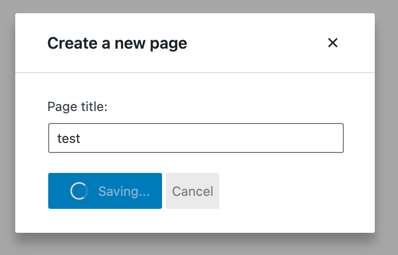
And that’s it! Here's what our new form looks like in action:
Wiring it all together
Here’s everything we built in this chapter in one place:
function CreatePageForm( { onCancel, onSaveFinished } ) {
    const [title, setTitle] = useState();
    const { lastError, isSaving } = useSelect(
        ( select ) => ( {
            lastError: select( coreDataStore )
                .getLastEntitySaveError( 'postType', 'page' ),
            isSaving: select( coreDataStore )
                .isSavingEntityRecord( 'postType', 'page' ),
        } ),
        []
    );

    const { saveEntityRecord } = useDispatch( coreDataStore );
    const handleSave = async () => {
        const savedRecord = await saveEntityRecord(
            'postType',
            'page',
            { title, status: 'publish' }
        );
        if ( savedRecord ) {
            onSaveFinished();
        }
    };

    return (
        <PageForm
            title={ title }
            onChangeTitle={ setTitle }
            hasEdits={ !!title }
            onSave={ handleSave }
            lastError={ lastError }
            onCancel={ onCancel }
            isSaving={ isSaving }
        />
    );
}

function EditPageForm( { pageId, onCancel, onSaveFinished } ) {
    const { page, lastError, isSaving, hasEdits } = useSelect(
        ( select ) => ( {
            page: select( coreDataStore ).getEditedEntityRecord( 'postType', 'page', pageId ),
            lastError: select( coreDataStore ).getLastEntitySaveError( 'postType', 'page', pageId ),
            isSaving: select( coreDataStore ).isSavingEntityRecord( 'postType', 'page', pageId ),
            hasEdits: select( coreDataStore ).hasEditsForEntityRecord( 'postType', 'page', pageId ),
        } ),
        [pageId]
    );

    const { saveEditedEntityRecord, editEntityRecord } = useDispatch( coreDataStore );
    const handleSave = async () => {
        const savedRecord = await saveEditedEntityRecord( 'postType', 'page', pageId );
        if ( savedRecord ) {
            onSaveFinished();
        }
    };
    const handleChange = ( title ) => editEntityRecord( 'postType', 'page', page.id, { title } );

    return (
        <PageForm
            title={ page.title }
            onChangeTitle={ handleChange }
            hasEdits={ hasEdits }
            lastError={ lastError }
            isSaving={ isSaving }
            onCancel={ onCancel }
            onSave={ handleSave }
        />
    );
}

function PageForm( { title, onChangeTitle, hasEdits, lastError, isSaving, onCancel, onSave } ) {
    return (
        <div className="my-gutenberg-form">
            <TextControl
                __next40pxDefaultSize
                label="Page title:"
                value={ title }
                onChange={ onChangeTitle }
            />
            { lastError ? (
                <div className="form-error">Error: { lastError.message }</div>
            ) : (
                false
            ) }
            <div className="form-buttons">
                <Button
                    onClick={ onSave }
                    variant="primary"
                    disabled={ !hasEdits || isSaving }
                >
                    { isSaving ? (
                        <>
                            <Spinner/>
                            Saving
                        </>
                    ) : 'Save' }
                </Button>
                <Button
                    onClick={ onCancel }
                    variant="tertiary"
                    disabled={ isSaving }
                >
                    Cancel
                </Button>
            </div>
        </div>
    );
}
All that’s left is to refresh the page and enjoy the form: